Although the instructions and screenshots on this page relate to adding a write-OFF transaction, similar steps and screens apply to adding a write-ON transaction.
WIP Center - View, Add and Edit transactions
Write-offs (ons) can be applied when a job is open and can also be applied during the invoicing process and on closing a job. The write-off process can begin with a fixed amount that you want to write-off, or you might build a write-off amount by selecting individual WIP items on the job. In both cases two events need to occur:
- The allocation of the write-off to the relevant WIP items, and
- The assignment of the write-off, to the firm or staff.
This is the quick way to process any write-on or write-offs you may have, and is based on you having an amount in mind that you want to write-off. When the write-offs setting is Firm Only, the assignment options for resources are not available in the Add Write-off assignment accordion. This method is suitable for firms that want to write-off a fixed amount and do not feel the need to record which staff member was specifically responsible for it. It provides a straightforward way of processing such transactions.
- Click Add Write-off on a Job Details page OR from the Actions Menu in the WIP Center.
- Edit the write-off details, if required:
- Change the default (current) date - this date is used for the WIP transaction.
- Type the write-off reason.
- The reason is added to the Comment column in the View WIP window, where it can be edited.
- It also shows on the Write-on Breakdown Report
- Write-off the fixed amount:
- Type the write-off amount.
- Select Oldest WIP Items or Newest WIP items from the Allocate To list.
- Click Apply (only available of you have typed a write-off amount).
- The appropriate rows in the WIP items grid (oldest or newest) are selected and the expanded grid section is displayed showing the allocations.
- This provides a total for the grid for write-off/on and that amount being shown on the WIP grid accordion header and the Assignment write-off/on header.
- The amount field in the Write-off Fixed Amount section is cleared at the same time, and the Apply button becomes inactive.
- Click Save.
Enter write-off details including the date, reason, amount and allocation method

Auto allocation occurs based on the allocation method chosen

Assignment of the write-off is to the firm

When the write-offs setting is Firm or Resources, more options are available to you when you assign the write-off. This setting allows the write-on or write-off transactions to be assigned to your resources, whereby specific amounts are assigned to individual staff members. It is ideal for firms that want to review the amount of write-ons or write-offs that have been assigned to staff during a defined period.
- Click Add Write-off on a Job Details page.
- Edit the write-off details, if required:
- Change the default (current) date - this date is used for the WIP transaction.
- Type the write-off reason.
- The reason is added to the Comment column in the View WIP window, where it can be edited.
- Select a write-off option:
- Write-off a fixed amount (default).
- Type the write-off amount.
- Select Oldest WIP Items or Newest WIP items from the Allocate To list.
- Click Apply (only available if you have typed a write-off amount).
- The appropriate rows in the WIP items grid (oldest or newest) are selected and the expanded grid section is displayed.
- This provides a total for the grid for write-off/on and that amount being shown on the WIP grid accordion header and the Assignment write-off/on header.
- The amount field in the Write-off Fixed Amount section is cleared at the same time, and the Apply button becomes inactive.
.png)
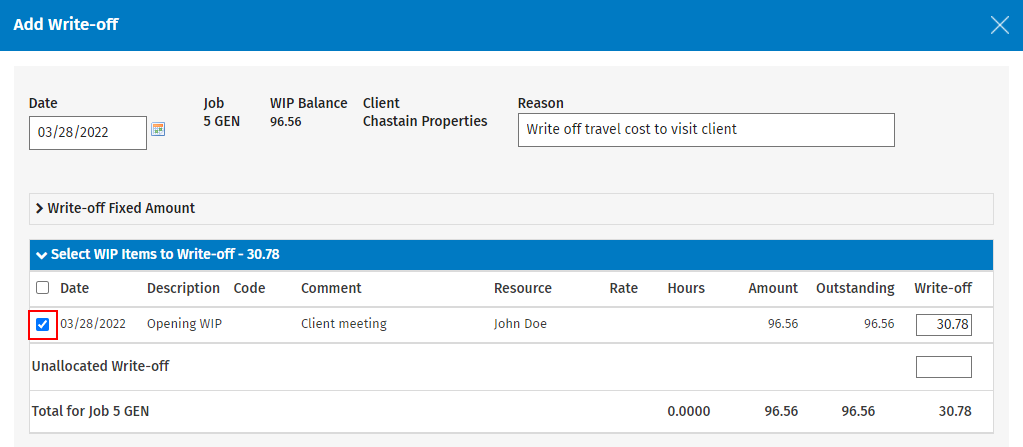
- Select specific WIP items to create the amount to write-off:
- Click Select WIP Items to Write-off to expand this section and view the WIP entries for the job (as this is a write-off, WIP debits are displayed only).
- Select the check boxes of the items to create the amount you want for the write-off.
- Edit the write-off amount, if required (the total amount and assignment amount will update accordingly).
.png)
- Assign the write-off:
- Click Assignment of Write-off to expand this section.
- Select the required option from the Assign Write-off list to: To Firm (default), Based on amounts entered, Based on hours allocated, Based on timesheets.
.png)
- Click Save.
- The Save button is unavailable until the Unassigned total is 0.00.
- A write-off transaction(s) is added to that job's WIP Ledger, for each user in the grid that had an amount entered against them.
The information below supplements the instructions above. This section is only available when your write-off setting is Firm or Resources and at least one user has allocated hours. Otherwise, it will be read-only and the write-off is assigned to your firm.
The grid
The grid displays anyone who worked on the job, including the users who are allocated to the job but have yet to work on it. The allocated users appear first (alphabetically), followed by the unallocated users. You can add other users to the grid, if required. The grid has six columns:
- Resource - the name of the user (the person who worked on the job).
- Role - the role(s) that the resource carried out on the job.
- Resource - if the user worked hours on the job, regardless of being allocated or not.
- Contact Partner - partner, as defined on the contact record.
- Contact Manager - manager, as defined on contact record.
- Job Owner - as defined on the job.
- Job Partner - partner, as defined on the job, only if activated.
- Job manager - manager, as defined on the job, only if activated.
- Allocated - the hours, if any, that the resource was allocated on the job (will be blank if there are no hours).
- Worked - the hours worked by resource on the job (if there are no hours, the worked resources will not show as a row).
- Variance - the hours variance from allocated (will show as a negative if there is an over allocation and will show as blank if there was no allocation).
- Amount - will be blank, you must enter this information.
The Assign Write-off option
You can use the Assign Write-off option to select how you want to assign the write-off. The options available in the list depend on the job but may include:
- To Firm - The grid appears dimmed as you have no other options to select. The write-off, either a fixed amount or selected amount(s), is assigned to your firm.

- Based on amounts entered - The grid displays anyone who worked on the job, including the users who are allocated to the job but have yet to work on it. The amount cells are blank, you must decide how much to assign to each resource. If you enter amounts that add up to be greater than the write-off amount total, the Unassigned total will go into negative (red font). When it arrives at 0.00 it will be positive (black font).

- Based on hours allocated - The grid displays anyone who worked on the job, including the users who are allocated to the job but have yet to work on it. This option acts as a shortcut, as the write-off amount is automatically split across the users that have an amount for allocated hours. The amount split is determined by the percentage of hours the user has of the total allocated for the job. For example, if the write-off is for 100.00 and there are two users in the grid that have allocated hours (greater than 0.00), and the allocations are 4 hours and 6 hours, then the 100.00 is split 40.00 to the first user and 60.00 to the second. Other users in the grid with no allocated hours receive nothing. You can edit any of the amounts. If you do so, the Assign Write-off list updates to show Based on amounts entered

- Based on timesheets - The grid displays anyone who worked on the job, including the users who are allocated to the job but have yet to work on it. This option acts as a shortcut, as data based on timesheet items that have been written off is entered automatically for you. This shortcut does not apply to write-ons, as timesheets are debit items only. The write-off amount that comes from timesheet items in the WIP items grid (middle section) is applied to the resources that belong to those timesheets. For example, Ian Jones in the WIP Item grid may have had two timesheet items totally 200.00 written off, and when the short cut is used in the assignment grid, that 200.00 will be applied to Ian Jones' row. This may mean also that an amount is left in 'unassigned' as the WIP items written off may not all be timesheets. You can edit any of the amounts. If you do so, the Assign Write-off list updates to show Based on amounts entered.
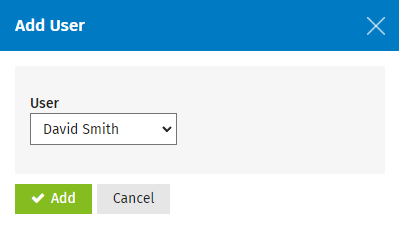
Add a user
If you want to assign the write-off to a user that does not appear in the grid, you can add a user:
- Click Add User below the grid.
- Select the user from the list.
- Click Save.
- A row is added to the bottom of the grid which contains the user's name in the resource column and the relevant role.
- The user will not be labeled a resource, and the hours and amount columns will be blank.
